If you have a huge digital Xbox game library, then you might be wondering what happens once you run out of storage on the 1TB hard drive every stock Xbox One X ships with. Deleting your games to make space for other titles isn’t fun, so I’m going to walk you through how to expand your console storage and, thus, your game library.
While Sony has ensured that it’s a breeze to upgrade the storage of its PS4 Pro, Microsoft makes it rather difficult and perilous to access and replace the Xbox One X’s hard drive. Instead, I’m going to show you a simple plug-and-play solution to get around this problem and you can use free Xbox live gift cards to buy products for your Xbox.
WHY YOU SHOULDN’T REPLACE THE XBOX ONE X’S HARD DRIVE?
First, the mere act of taking apart your Xbox One X voids the warranty. In addition, you have to almost completely disassemble the unit, a lengthy process that requires an iFixit tool kit with multiple Torx and Phillips head screwdrivers. I know — I went ahead and disassembled our office Xbox One X four times just to get used to it.
Originally, my goal was to replace the stock hard drive, clone the system software, and continue from there. However, Microsoft’s web of proprietary drive formats and partitioning makes replacing it impossible to replace the drive without the use of scripts or a deep understanding of hard drive file formats and partitioning. There is no user-friendly method of getting around this.
Afterward, I put the console back together (with its factory HDD) and was able to power it on without any problems, but at this point I would have already voided the warranty (if it wasn’t already expired).
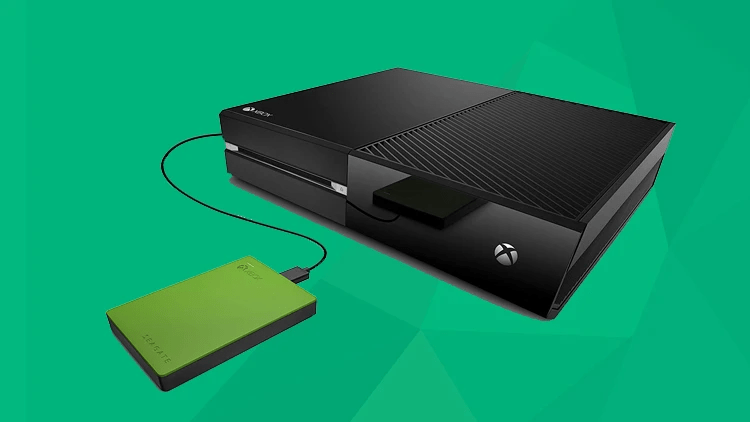
It’s much safer (and far easier) to just purchase an external hard drive for your Xbox One X and connect it to the console via a USB cable. For example, Seagate sells a licensed Xbox external hard drive with 4TB of storage for $119.99. It’s a simple plug-and-play solution that removes the potential for headaches.
HOW TO EXPAND YOUR XBOX ONE X’S GAME STORAGE WITH AN EXTERNAL DRIVE?
However, if you want to use your own hard drive rather than buy one specifically sold for the Xbox, I’m going to walk you through the process on how to set up your own external hard drive for game storage.
As a test bed, I used a 2TB FireCuda SATA 6GB/s hard drive that retails for $94.99. Next, I purchased an enclosure to be able to link the 2.5-inch hard drive to the Xbox One X; I used Sabrent’s 2.5-inch SATA to USB 3.0 enclosure that sells for $8.99.
The setup process is fairly simple:-
- Assuming you’re using a 2.5-inch HDD and an external enclosure, open the enclosure to expose the SATA port. Align your hard drive’s SATA connectors with the port, firmly pushing it in until snugly in place.
- Close your enclosure door (or replace the cover), then connect a USB 3.0 cable to the enclosure. Set the external hard drive to the side.
- Power on your Xbox One X. Once you’re at the home screen, plug in your external drive. The enclosure lights should come on (and you should hear the drive disk spinning).
- At this point, the Xbox interface will display a pop-up if the drive isn’t formatted. Using your Xbox controller, navigate to the “Format storage device” option and press the “A” button to select. On the next screen, you also have the option of naming the storage device.
- Follow the setup wizard’s instructions by confirming you’d like to format the drive in question. At this point, the Xbox interface will present you with the option to install future games and apps on the external hard drive, rather than on the console’s internal storage.
- Select “Install new things here” on the check box to confirm. Now you should be ready to download and install more games on your Xbox One X console.
- If you’d like to transfer games from the internal storage to the drive, here’s another tip you may find useful.
- Navigate to each game in your library (whether on the home screen or the storage screen). Press the menu button on your controller and select “Manage game.”
- You’ll be taken to a new screen where you’ll see a box detailing how much storage the game is using and where the files are located. Highlight the data information box using your Xbox controller’s D-pad or joystick, then press the menu button.
- In the menu that pops up, you’ll have the option to “Move” or “Copy” the game data from the internal to the external drive. If you’d like to free up some space on the internal drive, select the “Move” option. Next, confirm your file’s destination by selecting the external storage option (provided your external drive is plugged in and formatted).
- At this point, your files will be transferred into the external drive that’s plugged into the console. It may take a while — do not unplug it for any reason. Just wait until the process is finished.
Congratulations! You’ve expanded your Xbox game storage and, if you’ve followed this guide, also created your own Xbox external storage drive.